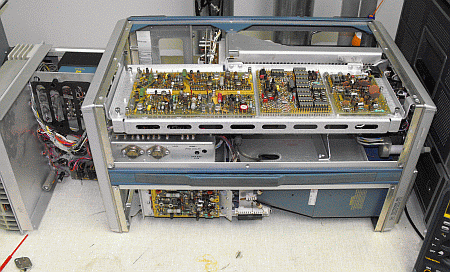
While attending a ham swap meet, I ran into an old friend. We were discussing the various items that we found interesting and the discussion came around to 2 Tektronix scopes that were on sale. He told me "oh yeah. I bought both of them but all I wanted was the plug in's. Do you want one?" That was a ridiculous question and soon I was loading a 7504 into my truck.
After opening it up and performing a visual inspection, I powered it up. Nothing. No lights, no display, nothing. It just sat there looking at me. I really didn't consider that as all bad for now I had another troubleshooting adventure before me.
The manual wasn't on BAMA so over to Artek Media I went. I had bought a manual from Dave before and was totally satisfied. He had a service manual listed for $5.00 and about 2 hours later I had the manual in my hands.
Step 1 was to check the power supplies.
| supply | tolerance | my reading |
|---|---|---|
| -50 | +/- 0.1 volt | -70.2 volts |
| -15 | +/- 0.75 volts | 0.663 volts |
| +5 | +/- 0.15 volts | 0.830 volts |
| +15 | +/- 0.30 volts | 21.01 volts |
| +50 | +/- 0.60 volts | 69.9 volts |
| +75 | +/- 2.25 volts | 96.4 volts |
| +150 | +/- 6.0 volts | 183 volts |
Clearly there was a problem.
In examining the schematics for the power supplies, I noticed that the only adjustable supply was the -50 volts. Also, it was that only supply that didn't use voltages from another supply. I had a -6.2 volt zener for a reference voltage and it also imported a +10 volts from a zener in the +50 volt supply. Both of these voltages were good.
The power transformer secondary had 53 vrms as called for in the print and after rectifying, was measurable across C812 as 70 volts. The input to the regulator was there so the problem was somewhere in the -50 volt regulator circuit.
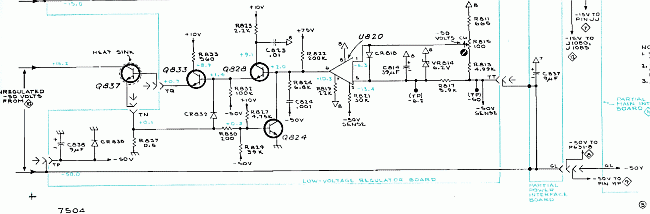
Here's the complete schematic but lets take a look at how this works in theory.
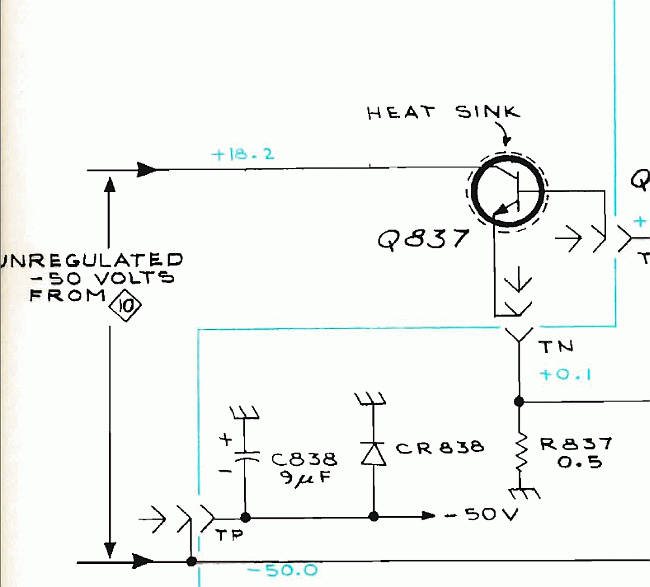
On the left we have the 70 volts coming from the rectifier and filter capacitor, C812. If we applied a ground at the point where it's marked +18.2 in blue, we would get -70 volts out on the -50 volt line. Likewise, if we moved the ground to the -50 volt line, we would get +70 volts at the +18.2 volt marker. We want a ground on the + line to make a - voltage power supply. Q837 is going to supply that ground for us. It it was a perfect transistor and turned on hard, it would give us a perfect ground on the + line and we would get -70 volts out. What this circuit does is to vary the resistance of Q837 such that it will drop the excess voltage from the -70 supplied. In my case, the combination of Q837 and R837 need to drop 20.2 volts which will leave -50 volts out. Remember, the original 70.2 volts didn't have a reference across C812. If we turn on Q837, current will flow from ground at the bottom of R837 up through Q837 causing a voltage drop - at ground to + at the collector of Q837. When Q837's conduction is adjusted to the point where the combination drops 20.2 volts, the output on the -50 volt line will be -70.2 + 20.2 or -50 volts. The rest of the circuit is there to automatically adjust the conduction of Q837 to drop the exact amount of voltage required to leave -50 volts out.
There are a couple of ways to troubleshoot this circuit. First, lets test Q837.
Q833 is socketed so if we remove it, be sure to keep track of how it is plugged in, we isolate Q837 from the rest of the circuit. Remove it, plug the scope in, and measure the voltage across R837. It should be very low. If Q837 is open or turned off, as it should be with no base bias, it will be 0 volts. If Q837 is leaky or shorted, there will be some value above 0. If you read anything above a few mv's Q837 is leaky or shorted. When the empty mainframe is functioning properly after repair, mine measured 38 mv's when the -50 volt supply was adjusted properly.
Now connect a low voltage power supply with the + lead connected to point TQ and and the - lead to the ground test point. To forward bias Q837, it will take a little over 0.6 volts so the power supply must have a fine voltage adjust. If you apply too much voltage, you will cause too much current to flow. Connect a voltmeter between the -50 volt test point and the ground test point. If you have a second voltmeter, connect it across R837. Slowly adjust the power supply voltage until the voltage across R837 begins to increase. As it does, the voltage on the -50 volt rail should begin to decrease. With careful adjustment, you should be able to set the -50 volt rail to around -50 volts. If you can, Q837 is good. If not, replace Q837. I used an SK9031. Remove power and all leads. If you replaced Q837, ohm meter Q833 for forward and reverse resistance of the base-emitter junction and the collector-emitter junction. If Q837 is bad, it may open up Q833. Mine did. Reinstall Q833.

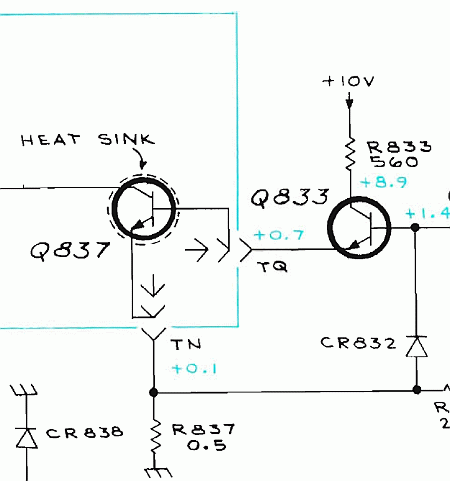
Next we will evaluate the operation of Q828 and Q833.
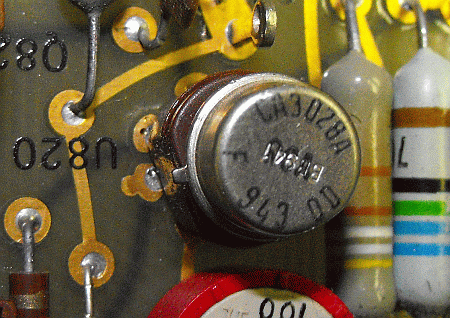
To isolate this section, unplug U820. Before doing that, note that the tab on the IC points to a small index marker etched into the board. The tab is pin 8. Pin 1 is ccw from it and you can see that pin 1 goes to the wiper of the pot as shown in the schematic.
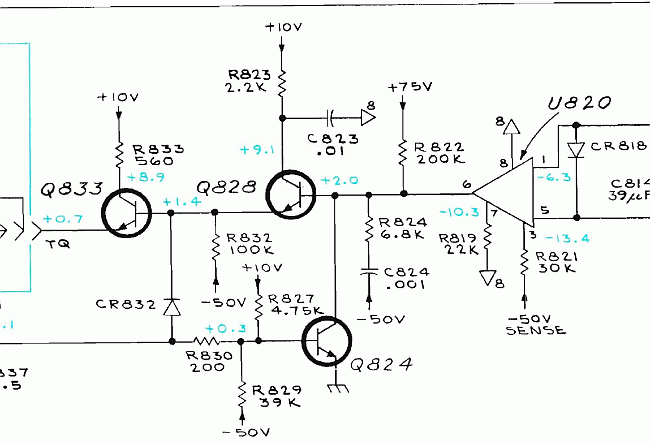
Test Q824 for a short with an ohm meter check from pin 6 to ground. It should read high. Q824 is an over current protector. If too much current flows in R837, it's voltage drop will turn on Q824 and remove the forward bias on Q837.
Now connect your low voltage supply between pin 6 and ground test point. I clipped onto the proper end of R822 to do this. Don't get the wrong end as the other end has at least 75 volts on it.
If you look at the voltages in blue starting at TQ, they make sense. TQ is the base of Q837 and the emitter is essentially at ground so should be around 0.7 volts or so. Q833 base is one diode junction away from TQ so should be 1.4 volts. Q828 base is one more diode junction so should be around 2.0 volts. Lets test it all.
Connect your voltmeter to the emitter of Q828. Note the voltage reading. You will have to increase the base voltage about 0.7 volts above that to turn on the transistor. Increase the power supply voltage until you see the meter reading increase. What is happening is Q828 is turning on and connecting the +10 volts to R832. If this doesn't happen, Q828 is bad. Turn the power supply back down and move the voltmeter probe to TQ. Slowly adjust the power supply again until you see the voltage at TQ increase. When it get to around =0.7 volts, Q837 should begin to turn on. Move the voltmeter probe to the -50 volt rail and as you continue to adjust the power supply, the voltage should decrease and be adjustable to around -50.
If you can adjust to around -50 volts, measure the voltage at U820 pin 1. It should be around -6.2 volts. If it isn't check the resistance's of R811, R815, and R813.
Check pin 5 for -6.2 volts.
You've tested almost all of the circuit. Remove the power supply as we won't need it for the rest of the checks. While you are in the area with U820 out, you might as well check R819 and R821 resistance.
Reinstall U820. If the supply still isn't working, replace U820. You might want to use one of the others from a different supply.
Once the supply is working, you can then check the others. The same troubleshooting process will work for the -15 volt supply as it is almost identical.
All of the power supplies are now within tolerances. I installed 2 plug ins and got a trace with most things operating correctly. There is a horizontal deflection problem though. Thats my next addition to the web page.