Horizontal Deflection Amplifier Troubleshooting
 |
Troubleshooting an oscilloscope amplifier is complicated by the fact that they are direct coupled. The signal path contains no capacitors or transformers from the probe tip to the deflection plates. That allows us to measure DC voltages. It also requires complicated power supply connections as the power supply voltages increase as you progress towards the deflection plates.
Below is a troubleshooting process that I developed as I worked on my 7504. It should work for other models as well.
After verifying the low voltage power supplies, if you have no trace visible, it could be because of CRT problems, high voltage problems, or voltages associated with the deflection plates. The deflection system is an easy place to check so we'll start there.
First remove all plug in's from the mainframe. With no plug in's, the CRT should display a dot somewhere near the center of the screen as there should be the same voltage on both horizontal plates and both vertical plates. After repair, my 7504 had 65.5 volts on both horizontal plates and 43 volts on the vertical plates. If your don't agree exactly with mine, it's probably ok as long as plate pair voltages are about the same.
|
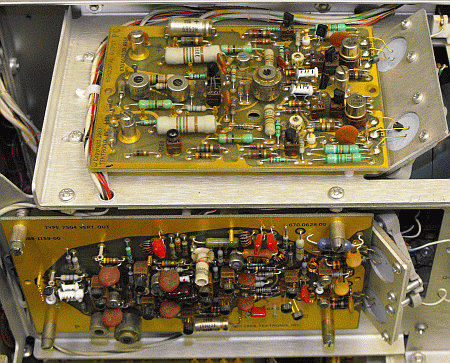 |
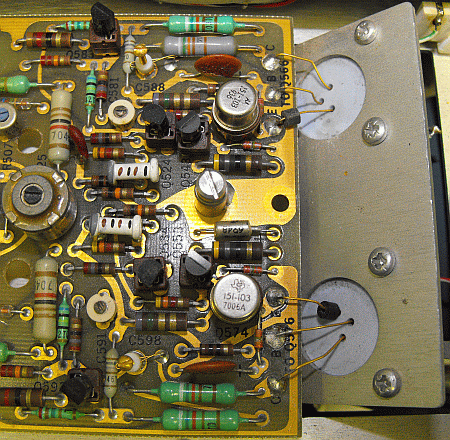
By some strange coincidence, the amplifier boards are arranged as named. The vertical board is vertical on the side and the horizontal board is horizontal on top. The angled metal plate on the right side of the boards is the heat sink of the output transistors. The round white circle is insulating material. |
 |
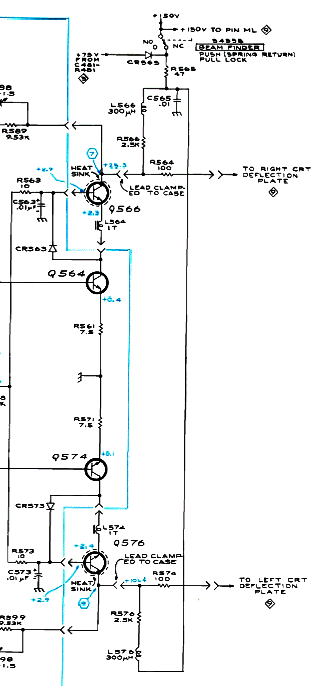
The output transistor leads are marked on the board. You should be able to make the voltage measurements right on the collector pad of the board. The ferrite beads are on the transistor emitters. To remove the board it is only necessary to unsolder the output transistor leads and loosen 3 hold down screws. |
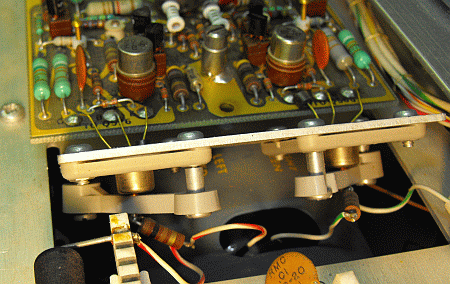 |
The output transistors have a unique attachment method. The plastic bar across the top is spring loaded and also forms the collector connection to the CRT plates.
When handling the plastic bar, be extremely careful as I would guess they are "unobtanium" and could break easily. |
 |
Once the transistors are un soldered, carefully apply pressure on the slotted end of the bar pushing down toward the transistor base and rotate the bar. The transistor is then free. There is a spring in the non-slotted end of the bar and a metal contact touching the can of the transistor. |
Now that we know how it's assembled, lets troubleshoot it.
The input for the horizontal amplifier comes from the horizontal channel switch. Measure the input voltage at TP504 and TP514 to eliminate the channel switch as the problem. My 7504 had 5.05 volts on TP504 and 5.05 volts on TP514. If there is much of a difference in voltage, remove Q504 and Q514, the input transistors and re measure. If either of the transistors were bad, it could give an erroneous voltage at the input pins. Once it is established that the input is correct, we can assume the problem is in the horizontal amplifier.
If the input voltages match, the problem is most likely in the amplifier board. That is actually good as it is probably the easiest thing to repair. One basic fact to remember on the deflection plate amplifiers is the signal paths through them are essentially identical. The signals fed into them are 180 degrees out of phase which causes one amp to go positive as the other goes negative creating push-pull deflection at the electron beam. This means that almost all of the circuit stages in the horizontal amplifier , left and right plates or in the vertical amplifier, up and down plates, are nearly identical so we can carefully swap positions of transistors from the left plate ampcircuit to the right plate amp circuit. If parts moved are good, no change will occur at the deflection plate until we move a bad transistor. Then the voltage difference at the plates should reverse. This method requires no parts until a bad component is found.
I started on the output end and worked towards the input on the assumption that the output was working harder and was more likely to fail. You could just as easily start at the input end. My initial voltages at the output transistor's collector was 131.5 volts on Q566 and 10.0 volts on Q576. That told me why the trace was about 1 foot to the right of the CRT. These voltages should be approximately the same. I swapped Q566 with Q576 with no voltage change. I then moved back and swapped Q564 and Q574 with no change. Swapping Q543 and Q553 caused the deflection plate voltages to reverse. Ah ha! One of those should be defective. Looking up the part number made it even better. They were 2N3904's I only have about 400 of them in a drawer. I replaced both of them and re measured the deflection plate voltages. They now measured 66.9 volts and 63.9 volts and the CRT had a dot near the middle of the screen. While monitoring the voltages I adjusted the DC Center pot to make them the same. Both were now 65.5 volts.
After repair, the input to the horizontal amplifier looks like the picture on the left. The collector of the output transistor is displayed in the picture on the right. The extra "fuzz" is caused by the readout time sampling.

