Tony Parks' (KB9YIG) Hints
I have built about twenty of the RXTX kits this year with all working properly. For (the toroidial transformers):
- I first wind the single wire winding and spread it somewhat uniformly around the core.
- Next the two wires for the bifilar winding are twisted together with about three twists per inch.
- The Twisted pair of wires is then wound on top of the single wire winding and again wound distributed somewhat uniformly around the core. The bifilar windings start and end close together and also close to the start and end of the single wire winding.
- Make the single wire winding such that the lead length are longer than the bifilar winding lead lengths for identification.
- I like to use a small fold of sandpaper to remove the enamel insulation from each wire about 1/8 of an inch from the core. Each wire is carefully pulled several times through the fold of sandpaper to remove the insulation close to the core and only about 1/4 inch of enamel insulation is removed from each lead.
- I then use an ohmmeter to identify lead pair of each bifilar winding and cut the lead lengths of each winding lead pair to different lengths. This "marks" leads so that they can be routed through the appropriate holes in the transformer mounting location and makes it easier to get the wires through the various holes. Also after the leads have been inserted through the board the leads lengths still identify windings for checking prior to soldering.
- Allow each transformer to stand vertically about 1/8 of an inch above the board with each lead otherwise pulled snug from the bottom of the board.
- Excess lead length is cut off after soldering
Kees Talen's (KB5BCQ) Hints
The correct way to wind core transformers is:
- Each time through the center counts as 1 turn
- Spread the turns out evenly around the diameter of the core, if that means overwind the previous layer because it requires more than one layer ....that's OK
- For a second or third layer, bifilar, trifilar, hexfilar, etc or not ....spread the turns out evenly around the diameter of the core as if the first layer wasn't even there
- Wind ALL the turns in the same direction.....if you start by going through the core from the top and wind counter-clockwise, continue to do so for ALL the windings
- All windings should be tight enough to keep the turns in place.....Don’t worry about rubbing through the insulation
- Straighten out all loops before they become "kinks" ....a "kink" makes the wire VERY weak at that point
- Cut the wire ends to an appropriate length, scrape the insulation off with an X-Acto knife or razor blade and measure the individual windings with an ohm meter so you know which ones are pairs (VERY IMPORTANT).
- Rearrange them as appropriate per the PC board, insert, and solder.
Additional resources
Charles WC5MC
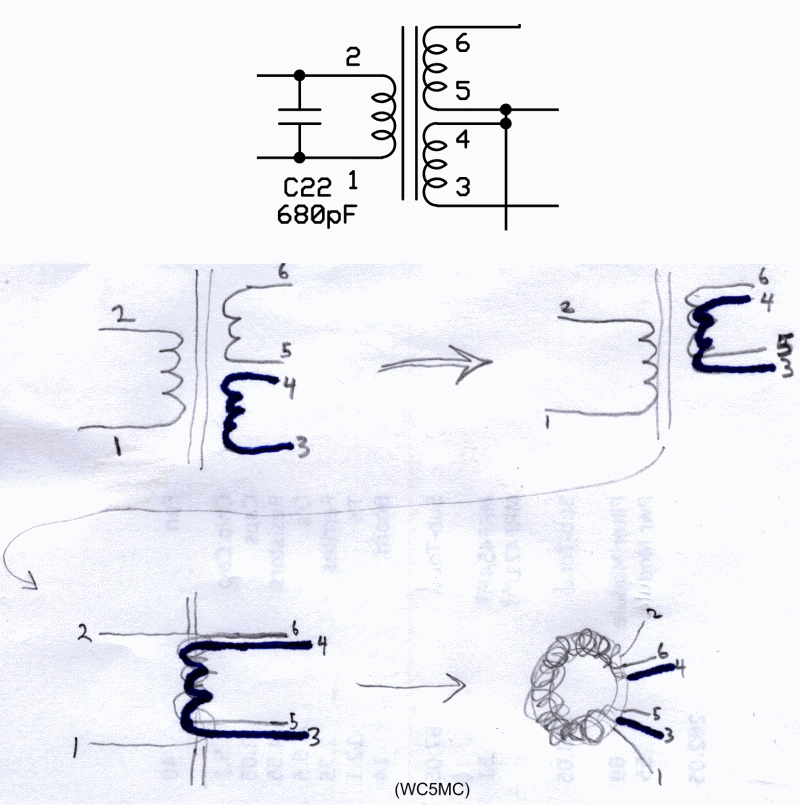
Charles has provided a nifty sketch that illustrates the answer to how bifilar windings work. It was in answer to a recent question on the reflector from Jerry WT0W:
"When I wind a bifillar winding, if I hairpin the wire to start winding, once I'm done, is one of the original hairpined wires (after I cut them apart) the end of one winding (as marked with the dot), and is the other the start of the next winding? Or are both wires either the start or finish of the windings? The last thing that I want to do is end up with "bucking" windings and I've never used the bifillar technique before."
Charles' answer:
